Although I am by no means an expert, I have been asked quite a bit about digital photography lately. Here's an article intended to be a quick reference for the people who asked me and for others who might stumble upon it. I will try to make it both short and comprehensive. All information in the article comes from my own experience and I'm sure there are better guides out there. I use a Canon 7D but the parameters of a photo are the same regardless of the instrument. And these parameters are:
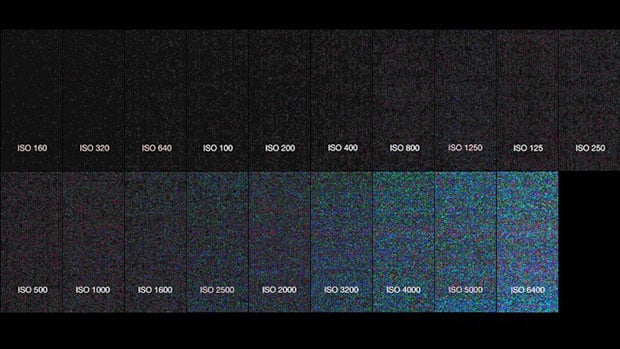 |
| How image noise looks like |
Sensitivity (ISO) - on film, it refers to the density of thickness of the strip of film. In a digital medium, it is simply a measurement of the sensor's sensitivity to light. The higher the ISO, the bigger the sensitivity, so ISO will be increased when the amount of light is low. Increasing the ISO, however, results in image noise (granulation), so ideally you want to work with as low an ISO value as possible (ISO 100 is ideal, but not always possible, depending on lighting conditions). For Canon DSLR, it is recommended to use
ISO values that are multiples of 160.
 |
| Also look up motion blur |
Shutter speed (exposure time) - represents the length of time for which the shutter stays open, allowing the sensor to receive light. It is usually represented as fraction of a second. (1/10, 1/25, 0' 5" or 1/2). Obviously, the longer the time, the more light the sensor so for low light conditions you will want to use a longer exposure time. However, for long exposure times both the subject and the camera have to be still (ideally the camera would be on a tripod), otherwise you will get the ghost effect in the photo, or the full bright white areas. If the subject is moving fast, such as athletes at sporting events, then you will want the exposure time to be as short as possible while still getting enough light, so that the picture is crisp and there are no blurred parts. Normally you should keep the exposure time defaulted at 1/25 (which is close to the film camera speed of 24 frames per second - fps) and adjust according to the light conditions.
 |
| Depth of field illustrated |
Depth of field (focus range) - The focus (not to be confused with focal distance) is defined as the distance from the lens at which a point object produces a point image. While precise focus is only possible at one distance, on each side of the focus plane there will be an area in which the subject will appear to be sharp and focused when viewed at a maximum image resolution. This area is called the depth of field. It varies according to the focal distance and the aperture.The bigger the focal distance, the further away the focus plane will be and the lower the aperture (the higher the f/ value), the bigger the depth of field. If you need a small depth of field (shallow focus), such as for a portrait, you will used a high aperture value (say f/2.8) and shoot from close by. If you need a big depth of field (deep focus), such as for a landscape, you will use a small aperture (f/16, f/22) and a focal length dictated by the distance to the closest object that needs to be in focus.
 |
| Aperture values represented |
Aperture (focal ratio or t-stop) - it is represented by a number in a logarithmic series preceded by f/ (f/1.2, f/1.4, f/2, f/2.8, f/3.5 .. f/28) and it shows how big the hole through which light gets into the sensor will be. Aperture is probably the most counter-intuitive parameter of the camera and maybe the most important. The higher the f number, the smaller the aperture, so the less light will get into the sensor. This means f/1.2 is the biggest possible aperture, while f/22 means a very small aperture and should only be used in very bright sunny weather. While the crispiest images will be obtained with an aperture of 4-5.6, the value of the aperture used should be determined by the quantity of light available and by the depth of field required. For the aperture greatly influences the depth of field, them being in a reverse proportionality: the higher the aperture, the smaller the depth of field. f/1.2 will have the smallest depth of field, while f/22 will give you a huge depth of field. While I have used here the f/1.2 value, you will notice most prime lenses will have the biggest aperture set at f/2.8, while most zoom lenses have it at f/3.5. Meaning the aperture is a characteristics of the lens, not of the camera. But the point is: the more light, the smaller the aperture, the bigger the f/ value.
 |
| Focal length is given as a millimetre value |
Focal length (zoom value) - is the distance between the image capturing medium (film or sensor) and the optical centre of the capturing lens. It is a characteristic of the lens, obviously, and on zoom lenses is indicated by its minimum and maximum values. The focal length dictates the field of view angle (the smaller the focal length, the bigger the fov angle) and the distance to the focus plane (the smaller the focal length, the smaller the distance to focus). The human eye has a focal length of about 35-40 mm, so this is the focal length to use if you want a 'realistic' field of view. A low focal length value will give you an optical aberration known as fish eye effect (bending of the edges of the image) which can be more or less obvious depending of the lens. Whenever possible, use prime lenses (an unique focal length) rather than zoom lenses (variable focal length), as they contain less glass and therefore give you more definition. Likewise, try and get closer to the subject rather than using the zoom, as using the lens at its smallest focal length position gives you the greatest control over the image.
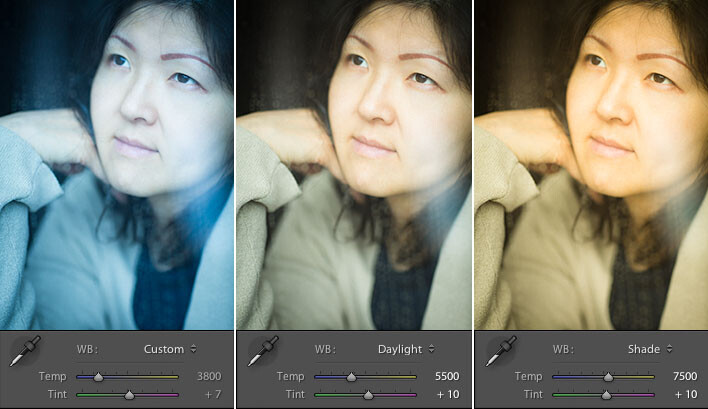 |
| The three colour palettes |
White balance (K temperature) - is a parameter specific to digital imaging and it is defined as the temperature at which a black object should be heated to give the white colour on camera. This is dictated by your light source and it dictates the colour palette of your image. A low K temperature results in warm, yellow tones, for the naked eye while a high colour temperature results in cold, blue tones. While there are standard values for various light sources (3200K for tungsten lighting, 6400K for HMI lighting and standard outdoors), the white balance will be chosen according to the desired look of the final product. For a natural look you can either experiment with different values or use the AWB setting (auto white balance - this uses the camera specific algorithm to determine the k temperature). For a vivid colour palette (yellow tones), the white balance should be set to a higher value than the one of the light sources, while for a cold, blue, unnatural colour palette, the K temperature should be set to a lower value than the light sources.
These 6 are the most important features of the image, along with the image resolution (number of megapixels), which should always be set to the highest possible. There is a lot more to say about each of them and there are more parameters than this to a digital image. I have tried to cover the basics, although I have also provided links that go into more detail. It is my belief that understanding how these 6 concepts work and how they alter your image will be enough to put one on the path to become a professional photographer.
Niciun comentariu:
Trimiteți un comentariu